Add a Step to a Multi Issue Operation
To add an step to an newly created multi issue operation, click Add Step next to the operation in the "Operations" dialog.
The "Add Step" dialog is displayed.
The following actions are available for multi issue operations:
Create new page
Creates one Confluence page for all the current issues from a multi issue template.
Enter the following information:
- Name: Enter a name for this step. This is only shown in the administration dialogs. If left empty, the below action text will be used.
- Template Selection: Select how the template is selected.
The following options are available:- Predefined template: Select the template that should be used from the "Template" drop-down menu. You can create new templates on the "Manage Templates" page.
- Let the user select the template: The user will be prompted to select the template. You can select an existing user input or let the Issue Publisher create a new user input.
- Predefined template: Select the template that should be used from the "Template" drop-down menu. You can create new templates on the "Manage Templates" page.
- Parent Selection: Select how the parent page/content is selected.
The following options are available:- Let the user select the content: The user will be prompted to select the parent page/content. You can select an existing user input or let the Issue Publisher create a new user input.
- Content of previous step: The page/content of the previous step in the operation is used. (This option is only available if this is not the first step.)
- Predefined content: Select the target server from the "Server" drop-down menu and enter the page/content ID in the "Parent Content" text box. Variables will be replaced.
- No parent content: Select the target server from the "Server" drop-down menu and enter the space key in the "Space" text box.
- Existing Page: Select what to do when a page with the same title exists already in the space. Possible options are throwing an error (Fail), skipping creating the page (Skip), updating the existing page in-place (Update in-place) or updating the page and moving it under the selected parent page (Update and move).
- Create Link: Select if the user has to select a parent page or if a fixed page is used as parent page. The matching Application Link and page ID will be saved.
- Save ID: Select the ID of the created page(s) should be saved in a custom field.
If you select "Yes", a drop-down menu "Field to Save ID" is displayed.
- Error Handling: Select whether to fail the operation in case of an error within this step (Fail) or to ignore them (Ignore). The default should be Fail, especially if the next step depends on this one.

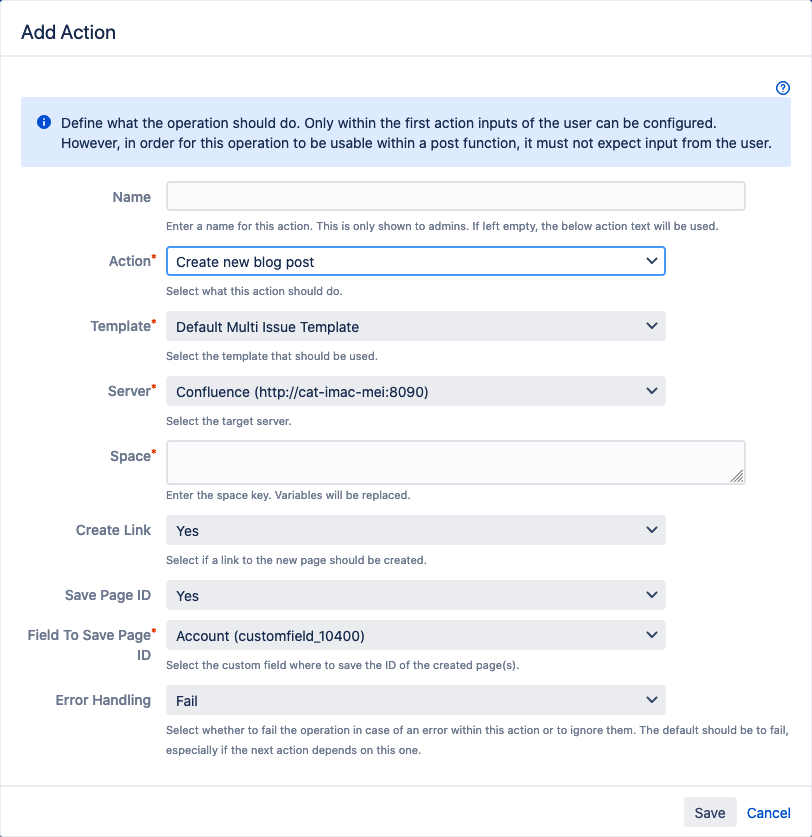
Create new blog post
Creates a new blog post in Confluence for all the current issues.
Enter the following information:
- Name: Enter a name for this step. This is only shown in the administration dialogs. If left empty, the below action text will be used.
- Template Selection: Select how the template is selected.
The following options are available:- Predefined template: Select the template that should be used from the "Template" drop-down menu. You can create new templates on the "Manage Templates" page.
- Let the user select the template: The user will be prompted to select the template. You can select an existing user input or let the Issue Publisher create a new user input.
- Predefined template: Select the template that should be used from the "Template" drop-down menu. You can create new templates on the "Manage Templates" page.
- Server: Select the target server.
- Space: Enter the space key. Variables will be replaced.
- Create Link: Select if a link to the new page should be added to the Jira issue.
- Save Page ID: Select the ID of the created page should be saved in a custom field.
If you select "Yes", a drop-down menu "Field to Save Page ID" is displayed. - Error Handling: Select whether to fail the operation in case of an error within this step (Fail) or to ignore them (Ignore). The default should be Fail, especially if the next step depends on this one.
Create new folder
Creates a new Confluence folder in the page tree for all the current issues.
Enter the following information:
- Name: Enter a name for this step. If left empty, the name of the action will be used as label.
- Title: Enter the title of the folder. Variables will be replaced.
- Parent Selection: Select how the parent page/content is selected.
The following options are available:- Let the user select the content: The user will be prompted to select the parent page/content. You can select an existing user input or let the Issue Publisher create a new user input.
- Content of previous step: The page/content of the previous step in the operation is used. (This option is only available if this is not the first step.)
- Predefined content: Select the target server from the "Server" drop-down menu and enter the page/content ID in the "Parent Content" text box. Variables will be replaced.
- Create Link: Select if a link to the new folder should be added to the Jira issue.
- Save ID: Select weather the ID of the new folder should be saved in a custom field. If you select "Yes", a drop-down menu "Field to Save ID" is displayed.
- Error Handling: Select whether to fail the operation in case of an error within this step (Fail) or to ignore them (Ignore). The default should be Fail, especially if the next step depends on this one.
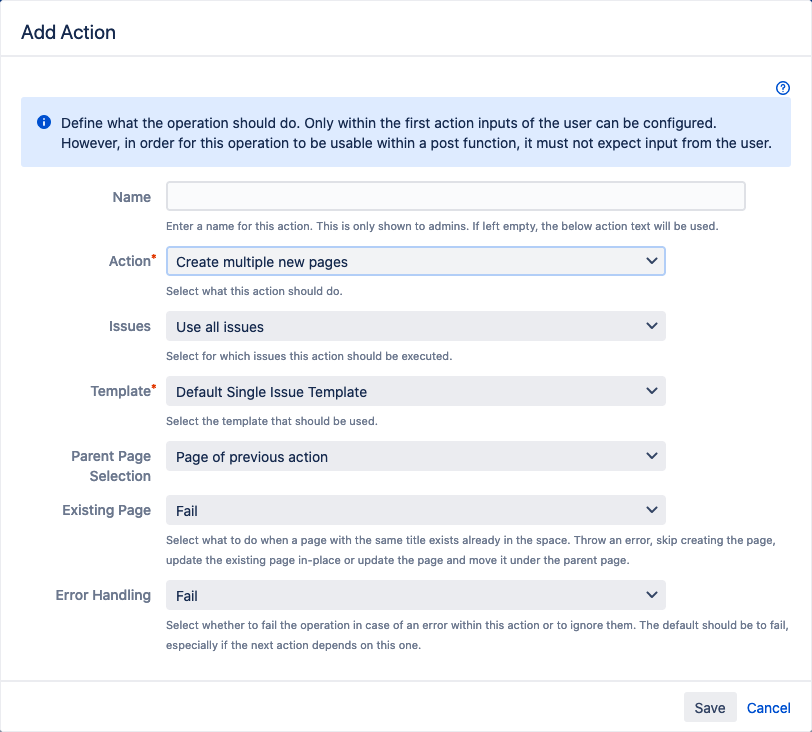
Create multiple new pages
Creates a new Confluence page for each issue.
Enter the following information:
- Name: Enter a name for this step. This is only shown in the administration dialogs. If left empty, the below action text will be used.
- Issues: Select for which issues this step should be executed.
- Template Selection: Select how the template is selected.
The following options are available:- Predefined template: Select the template that should be used from the "Template" drop-down menu. You can create new templates on the "Manage Templates" page.
- Let the user select the template: The user will be prompted to select the template. You can select an existing user input or let the Issue Publisher create a new user input.
- Predefined template: Select the template that should be used from the "Template" drop-down menu. You can create new templates on the "Manage Templates" page.
- Parent Selection: Select how the parent page/content is selected.
The following options are available:- Let the user select the content: The user will be prompted to select the parent page/content. You can select an existing user input or let the Issue Publisher create a new user input.
- Content of previous step: The page/content of the previous step in the operation is used. (This option is only available if this is not the first step.)
- Predefined content: Select the target server from the "Server" drop-down menu and enter the page/content ID in the "Parent Content" text box. Variables will be replaced.
- No parent content: Select the target server from the "Server" drop-down menu and enter the space key in the "Space" text box.
- Existing Page: Select what to do when a page with the same title exists already in the space. Possible options are throwing an error (Fail), skipping creating the page (Skip), updating the existing page in-place (Update in-place) or updating the page and moving it under the selected parent page (Update and move).
- Error Handling: Select whether to fail the operation in case of an error within this step (Fail) or to ignore them (Ignore). The default should be Fail, especially if the next step depends on this one.
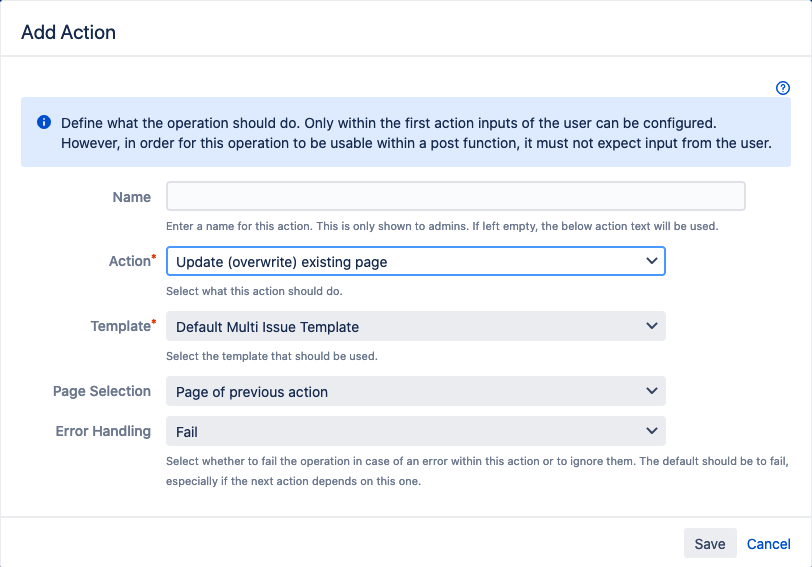
Update (overwrite) existing page
Updates respectively overwrites one Confluence page for all the current issues from a multi issue template.
Enter the following information:
- Name: Enter a name for this step. This is only shown in the administration dialogs. If left empty, the below action text will be used.
- Template Selection: Select how the template is selected.
The following options are available:- Predefined template: Select the template that should be used from the "Template" drop-down menu. You can create new templates on the "Manage Templates" page.
- Let the user select the template: The user will be prompted to select the template. You can select an existing user input or let the Issue Publisher create a new user input.
- Predefined template: Select the template that should be used from the "Template" drop-down menu. You can create new templates on the "Manage Templates" page.
- Page Owner: Optionally enter the account ID of a new page owner. Variables will be replaced.
- Page Selection: Select how the page is selected.
The following options are available:- Let the user select the page: The user will be prompted to select a page.
- Page of previous step: The page of the previous step in the operation is used. (This option is only available if this is not the first step.)
- Predefined page: Select the target server from the "Server" drop-down menu and enter the page ID in the "Page" text box. Variables will be replaced.
- Error Handling: Select whether to fail the operation in case of an error within this step (Fail) or to ignore them (Ignore). The default should be Fail, especially if the next step depends on this one.
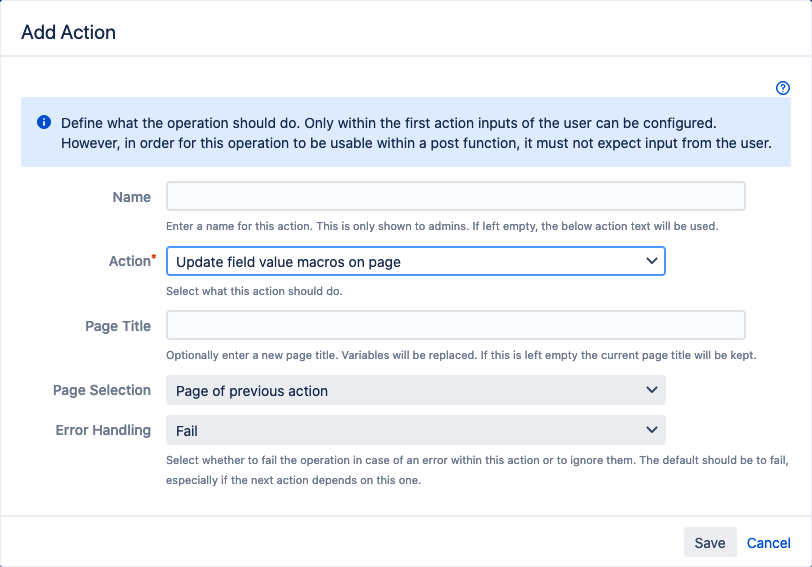
Update field values macros on page
Updates the values of the Jira Field Value Macros for the issues on the Confluence page.
Enter the following information:
- Name: Enter a name for this step. This is only shown in the administration dialogs. If left empty, the below action text will be used.
- Page Title: Enter a new page title. Variables will be replaced. If this is left empty the current page title will be kept.
- Page Owner: Optionally enter the account ID of a new page owner. Variables will be replaced.
- Page Selection: Select how the page is selected.
The following options are available:- Let the user select the page: The user will be prompted to select a page.
- Page of previous step: The page of the previous step in the operation is used. (This option is only available if this is not the first step.)
- Predefined page: Select the target server from the "Server" drop-down menu and enter the page ID in the "Page" text box. Variables will be replaced.
- Error Handling: Select whether to fail the operation in case of an error within this step (Fail) or to ignore them (Ignore). The default should be Fail, especially if the next step depends on this one.
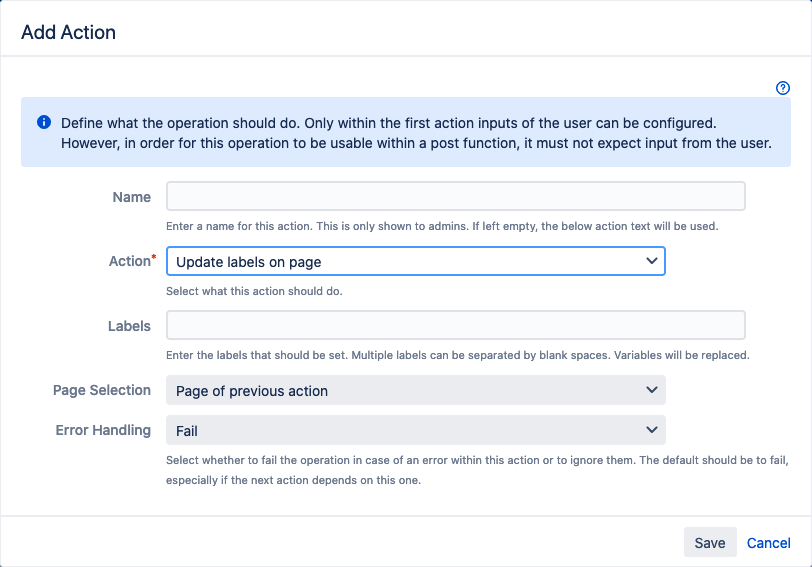
Update Labels on Page
Sets the labels on a Confluence page.
Enter the following information:
- Name: Enter a name for this step. This is only shown in the administration dialogs. If left empty, the below action text will be used.
Labels: Enter the labels that should be set. Multiple labels can be separated by blank spaces. Variables will be replaced.
To keep existing labels, add
$currentPage.labels.- Page Selection: Select how the page is selected.
The following options are available:- Let the user select the page: The user will be prompted to select a page.
- Page of previous step: The page of the previous step in the operation is used. (This option is only available if this is not the first step.)
- Predefined page: Select the target server from the "Server" drop-down menu and enter the page ID in the "Page" text box. Variables will be replaced.
- Error Handling: Select whether to fail the operation in case of an error within this step (Fail) or to ignore them (Ignore). The default should be Fail, especially if the next step depends on this one.
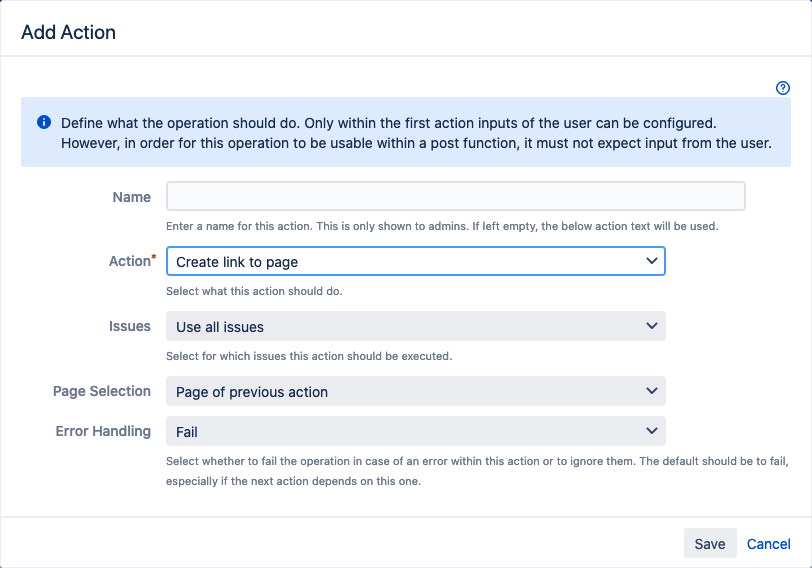
Create Link to Page
Creates a link from each Jira issue to the Confluence page.
- Name: Enter a name for this step. This is only shown in the administration dialogs. If left empty, the below action text will be used.
- Issues: Select for which issues this step should be executed.
- Page Selection: Select how the page is selected.
The following options are available:- Let the user select the page: The user will be prompted to select a page.
- Page of previous step: The page of the previous step in the operation is used. (This option is only available if this is not the first step.)
- Predefined page: Select the target server from the "Server" drop-down menu and enter the page ID in the "Page" text box. Variables will be replaced.
- Error Handling: Select whether to fail the operation in case of an error within this step (Fail) or to ignore them (Ignore). The default should be Fail, especially if the next step depends on this one.
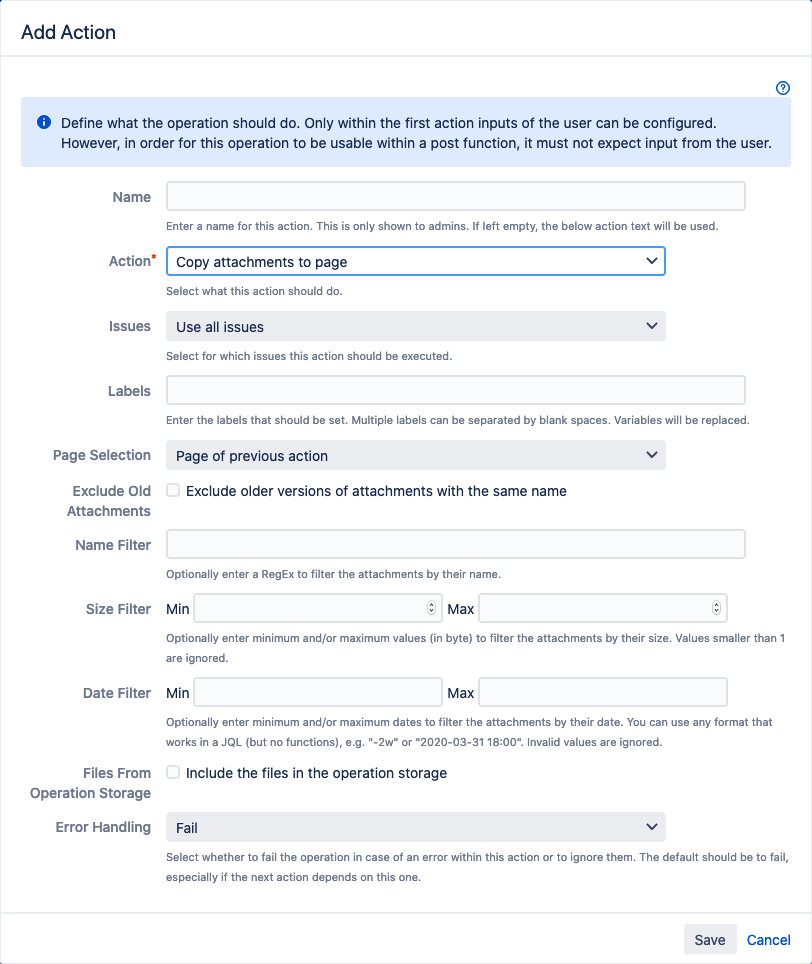
Copy Attachments to Page
Copies all attachments of each Jira issue to the linked Confluence page.
Enter the following information:
- Name: Enter a name for this step. This is only shown in the administration dialogs. If left empty, the below action text will be used.
- Issues: Select for which issues this step should be executed.
- Labels: Optionally enter labels that should be set on the attachments. Multiple labels can be separated by blank spaces. Variables will be replaced.
- Page Selection: Select how the page is selected.
The following options are available:- Let the user select the page: The user will be prompted to select a page.
- Page of previous step: The page of the previous step in the operation is used. (This option is only available if this is not the first step.)
- Predefined page: Select the target server from the "Server" drop-down menu and enter the page ID in the "Page" text box. Variables will be replaced.
- Exclude Old Attachments: Select if want to exclude older versions of attachments with the same name from copying.
- Name Filter: Optionally enter a regular expression to filter the attachments by their name.
- Size Filter: Optionally enter minimum and/or maximum values (in byte) to filter the attachments by their size. Values smaller than 1 are ignored.
- Date Filter: Optionally enter minimum and/or maximum dates to filter the attachments by their date. You can use any format that works in a JQL (but no functions), e.g. "-2w" or "2020-03-31 18:00". Invalid values are ignored.
Files From Operation Store: Select this option to copy files from the operation storage to a Confluence page.
The operation store is used to store files (attachments) temporarily during an operation to be used in other steps.
- Error Handling: Select whether to fail the operation in case of an error within this step (Fail) or to ignore them (Ignore). The default should be Fail, especially if the next step depends on this one.
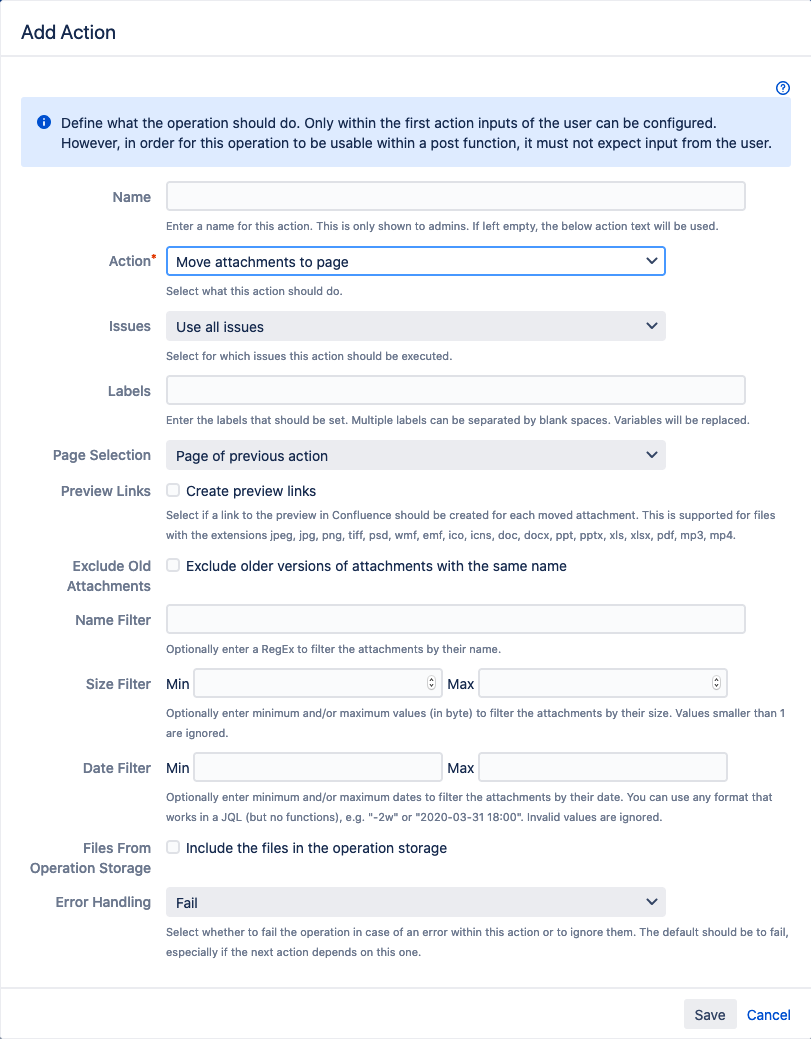
Move Attachments to Page
Moves all attachments of each Jira issue to the linked Confluence page.
Enter the following information:
- Name: Enter a name for this step. This is only shown in the administration dialogs. If left empty, the below action text will be used.
- Issues: Select for which issues this step should be executed.
- Labels: Optionally enter labels that should be set on the attachments. Multiple labels can be separated by blank spaces. Variables will be replaced.
- Page Selection: Select how the page is selected.
The following options are available:- Let the user select the page: The user will be prompted to select a page.
- Page of previous step: The page of the previous step in the operation is used. (This option is only available if this is not the first step.)
- Predefined page: Select the target server from the "Server" drop-down menu and enter the page ID in the "Page" text box. Variables will be replaced.
- Preview Links: Select if a link from the Jira issue to the preview in Confluence should be created for each moved attachment.
- Exclude Old Attachments: Select if want to exclude older versions of attachments with the same name from copying.
- Name Filter: Optionally enter a regular expression to filter the attachments by their name.
- Size Filter: Optionally enter minimum and/or maximum values (in byte) to filter the attachments by their size. Values smaller than 1 are ignored.
- Date Filter: Optionally enter minimum and/or maximum dates to filter the attachments by their date. You can use any format that works in a JQL (but no functions), e.g. "-2w" or "2020-03-31 18:00". Invalid values are ignored.
Files From Operation Store: Select this option to copy files from the operation storage to a Confluence page. The files are removed from the operation store.
The operation store is used to store files (attachments) temporarily during an operation to be used in other steps.
- Error Handling: Select whether to fail the operation in case of an error within this step (Fail) or to ignore them (Ignore). The default should be Fail, especially if the next step depends on this one.
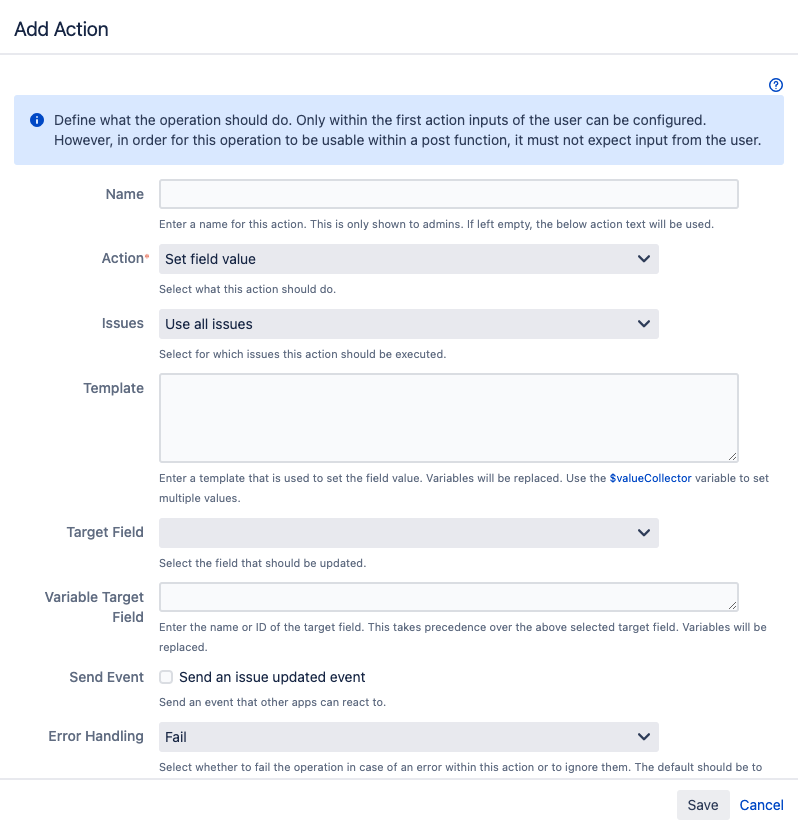
Set Field Value
Sets a custom field value on each issue.
Enter the following information:
- Name: Enter a name for this step. This is only shown in the administration dialogs. If left empty, the below action text will be used.
- Issues: Select for which issues this step should be executed. Possible options are:
- Use all issues
- Only use the main issue
- Only use the additional issues
Template: Enter a template that is used to set the field value. Variables will be replaced.
If you only execute this step for the main issue, you can still access the additional issues:
#foreach($additionalIssue in $issueHelper.getAdditionalIssues())
   ...
#end
- Target Field: Select the custom field that should be updated.
- Variable Target Field: Enter the name or ID of the target field you want to update by the step. The chosen field will take precedence over the above selected Target field. Variables will be replaced.
- Send Event: Click the checkbox to activate it and send an issue updated event other apps can react to.
- Error Handling: Select whether to fail the operation in case of an error within this step (Fail) or to ignore them (Ignore). The default should be Fail, especially if the next step depends on this one.
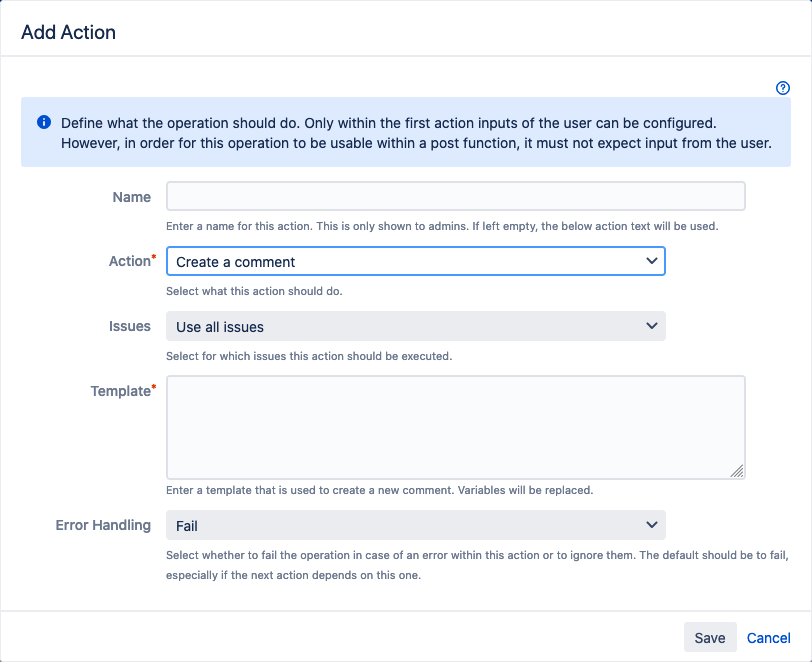
Create a comment
Creates a new comment on each issue.
Enter the following information:
- Name: Enter a name for this step. This is only shown in the administration dialogs. If left empty, the below action text will be used.
- Issues: Select for which issues this step should be executed. Possible options are:
- Use all issues
- Only use the main issue
- Only use the additional issues
- Template: Enter a template that is used to create a new comment. Variables will be replaced.
- Error Handling: Select whether to fail the operation in case of an error within this step (Fail) or to ignore them (Ignore). The default should be Fail, especially if the next step depends on this one.
Create web link
Creates a new web link on each issue.
Enter the following information:
- Name: Enter a name for this step. This is only shown in the administration dialogs. If left empty, the below action text will be used.
- Issues: Select for which issues this step should be executed. Possible options are:
- Use all issues
- Only use the main issue
- Only use the additional issues
- URL: Enter the URL of the link. Use relative URLs for local targets. Variables will be replaced.
- Link Title: Enter the link title. Leave empty to use the URL instead. Variables will be replaced.
- Error Handling: Select whether to fail the operation in case of an error within this step (Fail) or to ignore them (Ignore). The default should be Fail, especially if the next step depends on this one.

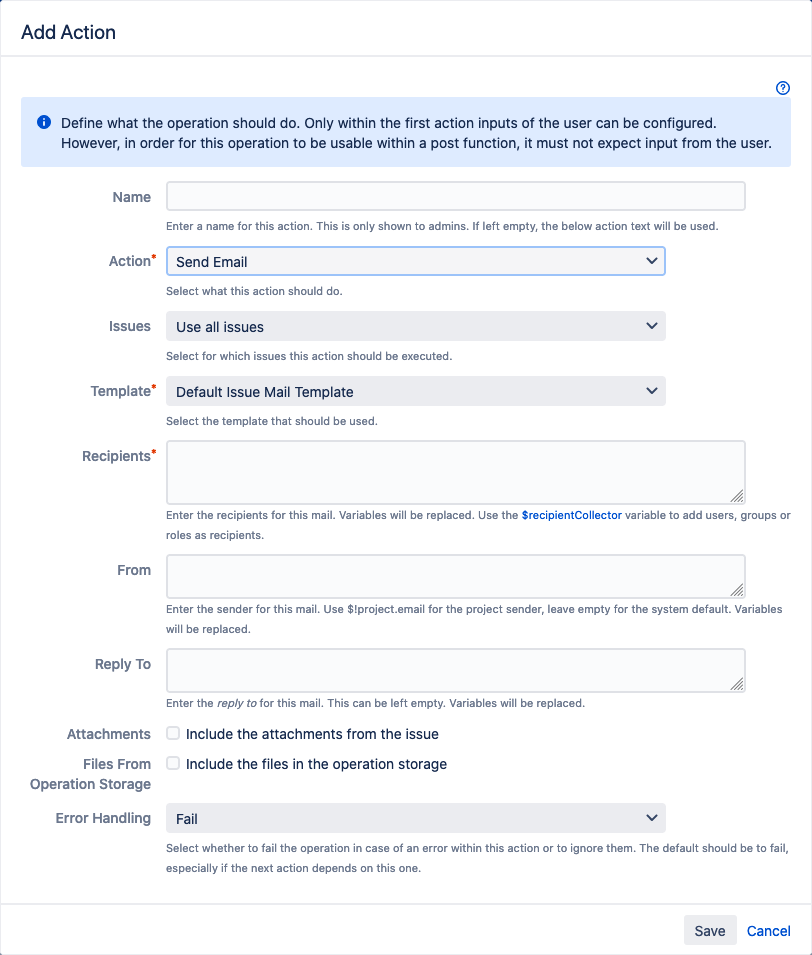
Send Email
Sends an email to Jira users or other email addresses for each issue.
Enter the following information:
- Name: Enter a name for this step. This is only shown in the administration dialogs. If left empty, the below action text will be used.
- Issues: Select for which issues this step should be executed. Possible options are:
- Use all issues
- Only use the main issue
- Only use the additional issues
- Template: Select the template that should be used.
- Recipients: Enter the recipients for this mail. Variables will be replaced. Use the
$recipientCollectorvariable to add users, groups or roles as recipients. - From: Enter the sender for this mail. Use
$!project.emailfor the project sender, leave empty for the system default. Variables will be replaced. - Reply To: Enter the reply to for this mail. This can be left empty. Variables will be replaced.
- Attachments: Select to add attachments to the the email.
Files From Operation Store: Select this option to add files from the operation storage as attachment to the email.
The operation store is used to store files (attachments) temporarily during an operation to be used in other steps.
- Error Handling: Select whether to fail the operation in case of an error within this step (Fail) or to ignore them (Ignore). The default should be Fail, especially if the next step depends on this one.
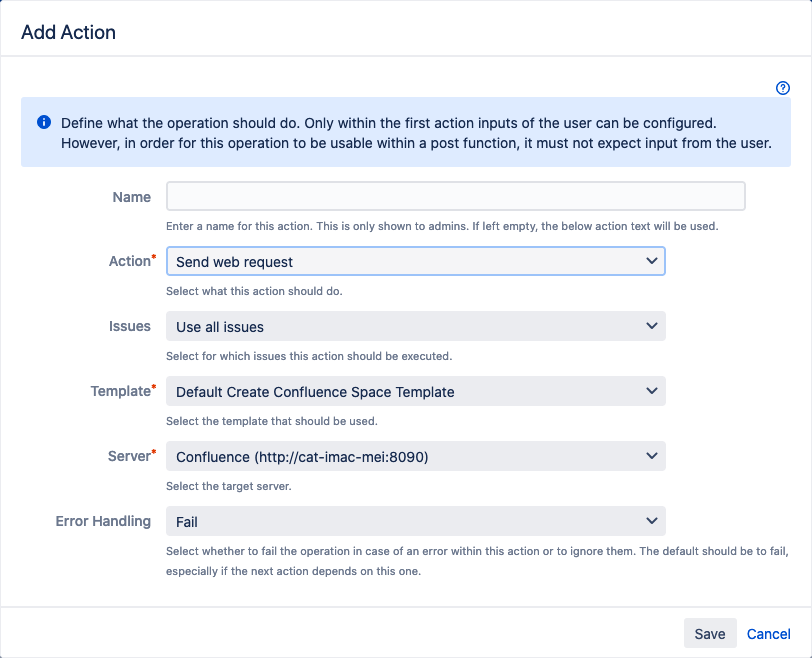
Send web request
Sends a web request (e.g. an HTTP POST) to a target server for each issue.
Enter the following information:
- Name: Enter a name for this step. This is only shown in the administration dialogs. If left empty, the below action text will be used.
- Issues: Select for which issues this step should be executed. Possible options are:
- Use all issues
- Only use the main issue
- Only use the additional issues
- Template: Select the template that should be used.
- Server: Select the target server.
- Error Handling: Select whether to fail the operation in case of an error within this step (Fail) or to ignore them (Ignore). The default should be Fail, especially if the next step depends on this one.
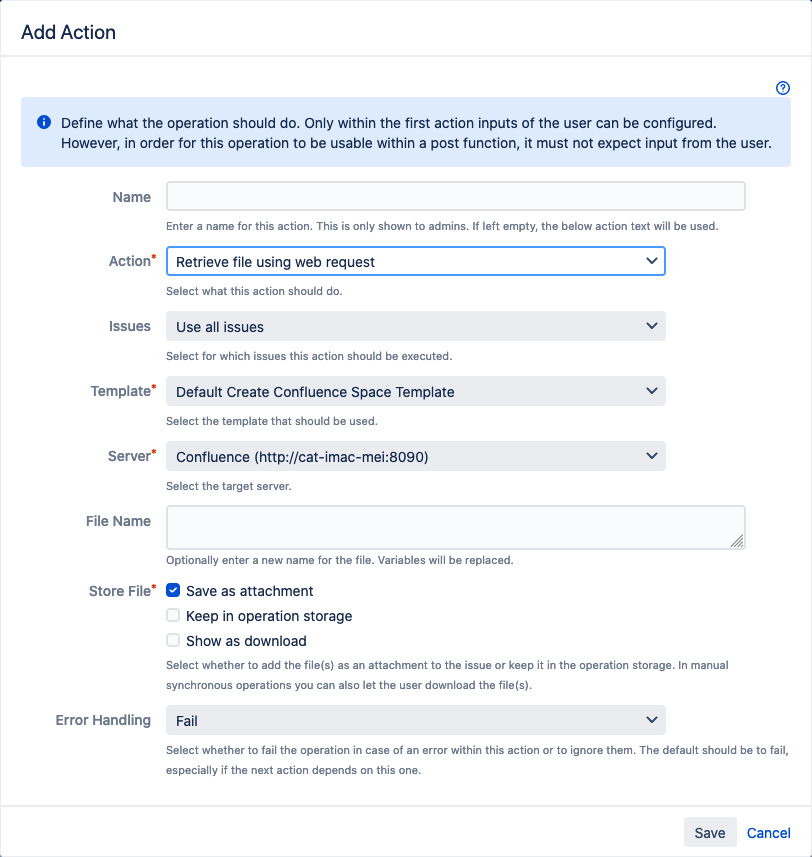
Retrieve file using web request
Retrieves a file using a web request (e.g. an HTTP POST) from a target server.
The operation store is used to store files (attachments) temporarily during an operation to be used in other steps.
Enter the following information:
- Name: Enter a name for this step. This is only shown in the administration dialogs. If left empty, the below action text will be used.
- Template: Select the template that should be used.
- Server: Select the target server.
- File Name: Enter a new name for the file. Variables will be replaced.
Store File: Select whether:
to add the file(s) as an attachment to the issue (Save as attachment) or
to keep it in the operation storage (Keep in operation storage).
In manual synchronous operations you can also let the user download the file(s).
- Error Handling: Select whether to fail the operation in case of an error within this step (Fail) or to ignore them (Ignore). The default should be Fail, especially if the next step depends on this one.
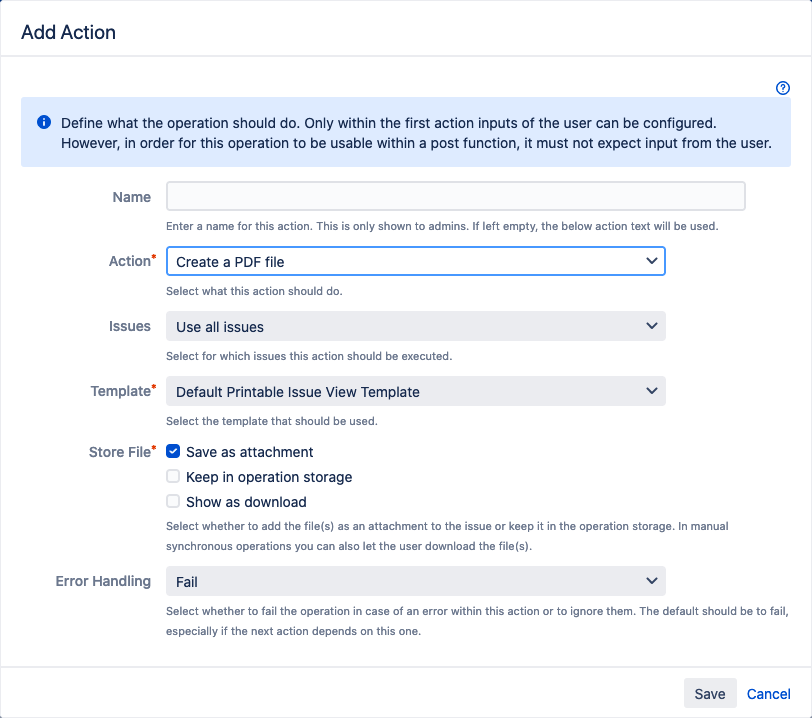
Create a PDF file
Creates a PDF file that includes content from multiple issues and is added to the current issue.
The operation store is used to store files (attachments) temporarily during an operation to be used in other steps.
Enter the following information:
- Name: Enter a name for this step. This is only shown in the administration dialogs. If left empty, the below action text will be used.
- Issues: Select for which issues this step should be executed. Possible options are:
- Use all issues
- Only use the main issue
- Only use the additional issues
- Template: Select the template that should be used.
Store File: Select whether:
to add the file(s) as an attachment to the issue (Save as attachment) or
to keep it in the operation storage (Keep in operation storage).
In manual synchronous operations you can also let the user download the file(s).
- Error Handling: Select whether to fail the operation in case of an error within this step (Fail) or to ignore them (Ignore). The default should be Fail, especially if the next step depends on this one.
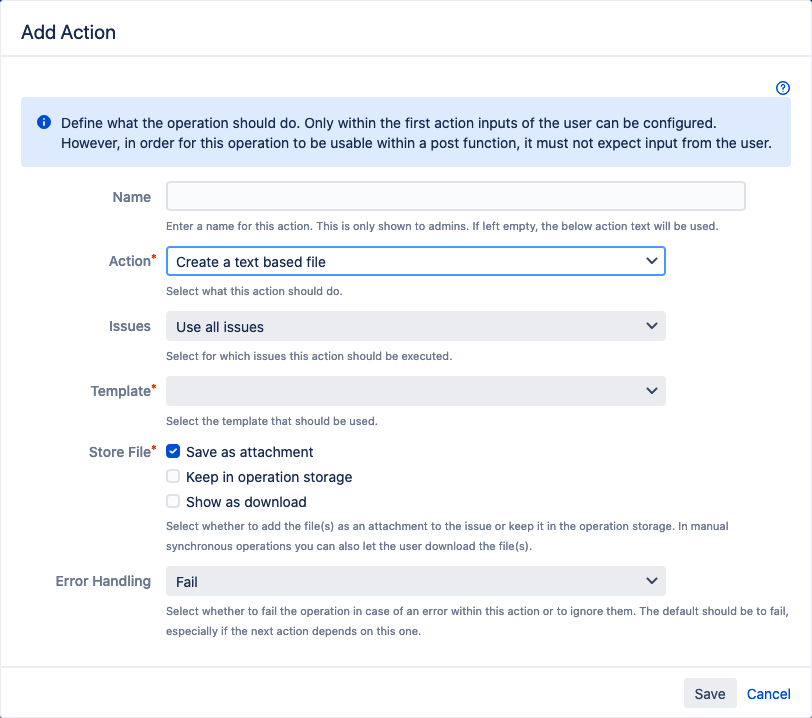
Create a text based file
Creates a text file that includes content from multiple issues and is added to the current issue.
The operation store is used to store files (attachments) temporarily during an operation to be used in other steps.
Enter the following information:
- Name: Enter a name for this step. This is only shown in the administration dialogs. If left empty, the below action text will be used.
- Issues: Select for which issues this step should be executed. Possible options are:
- Use all issues
- Only use the main issue
- Only use the additional issues
- Template: Select the template that should be used.
Store File: Select whether:
to add the file(s) as an attachment to the issue (Save as attachment) or
to keep it in the operation storage (Keep in operation storage).
In manual synchronous operations you can also let the user download the file(s).
- Error Handling: Select whether to fail the operation in case of an error within this step (Fail) or to ignore them (Ignore). The default should be Fail, especially if the next step depends on this one.
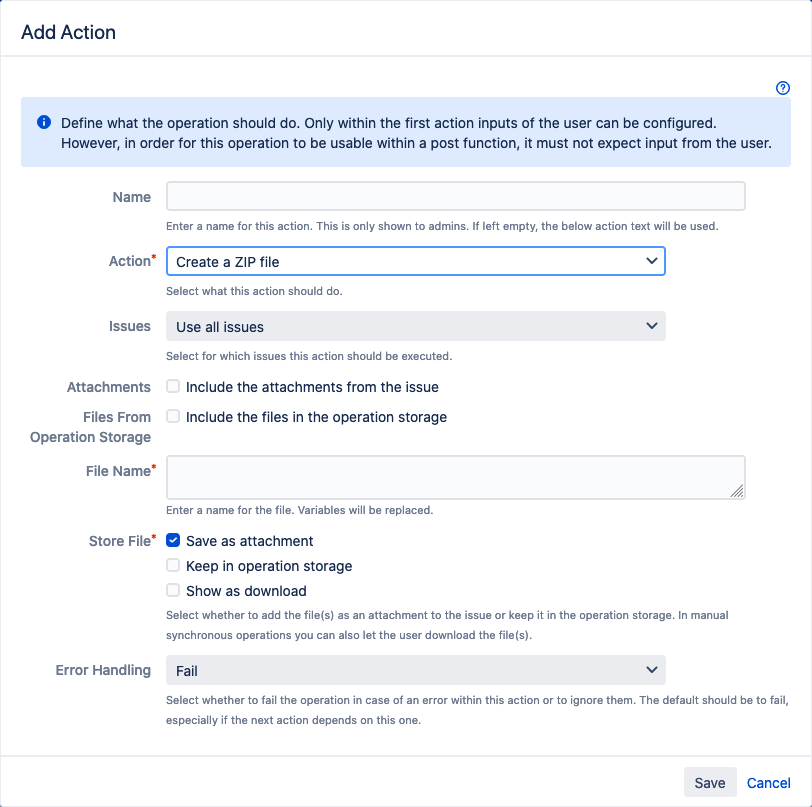
Create a ZIP file
Creates a ZIP file that includes content from multiple issues and is added to the current issue.
The operation store is used to store files (attachments) temporarily during an operation to be used in other steps.
Enter the following information:
- Name: Enter a name for this step. This is only shown in the administration dialogs. If left empty, the below action text will be used.
- Attachments: Select this option to include the attachments of the current issue to the ZIP file.
Files From Operation Store: Select this option to add the files from the operation storage to the ZIP file.
- File Name: Enter a new name for the file. Variables will be replaced.
Store File: Select whether:
to add the file(s) as an attachment to the issue (Save as attachment) or
to keep it in the operation storage (Keep in operation storage).
In manual synchronous operations you can also let the user download the file(s).
- Error Handling: Select whether to fail the operation in case of an error within this step (Fail) or to ignore them (Ignore). The default should be Fail, especially if the next step depends on this one.
When done, click Save.
The new step is listed in the "Single Issue Operations" frame in the "Operations" dialog.
To edit a step, click the pencil icon next to the step.
To delete a step, click the trash icon next to the step.
To add another step to the operation, click Add Step.