How to create and (de)activate Jira users
This simplified use case shows how new Jira users can be created, deactivated and reactivated in a local or remote Jira instance with the help of Teamworkx Issue Publisher for Jira. For this, each new user is represented as an issue within a designated Jira project. The necessary web requests to create, deactivate and reactivate the users are executed by three Issue Publisher operations. While most of the used functionality here has been available since version 9.3.0 of the Issue Publisher, some of the advanced error handling capabilities have only been available since version 11.4.0.
Server Connection
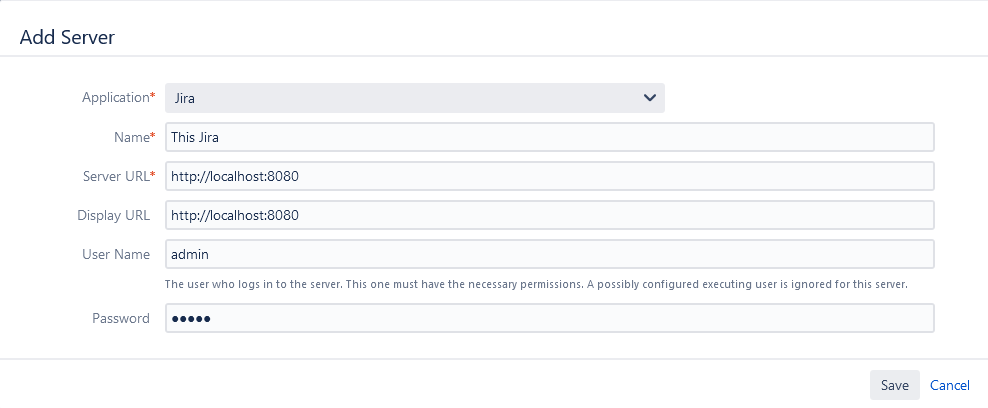
The Jira server you want to create users in has to be set up in the Server section of the Issue Publisher Configuration. You can configure the local Jira or a different one here. If an application link to the target Jira server has already been set up you can use that one, instead of setting up a custom connection.
Fields
In order to create a new user the following information is required:
- Email address
- Full name
- Username
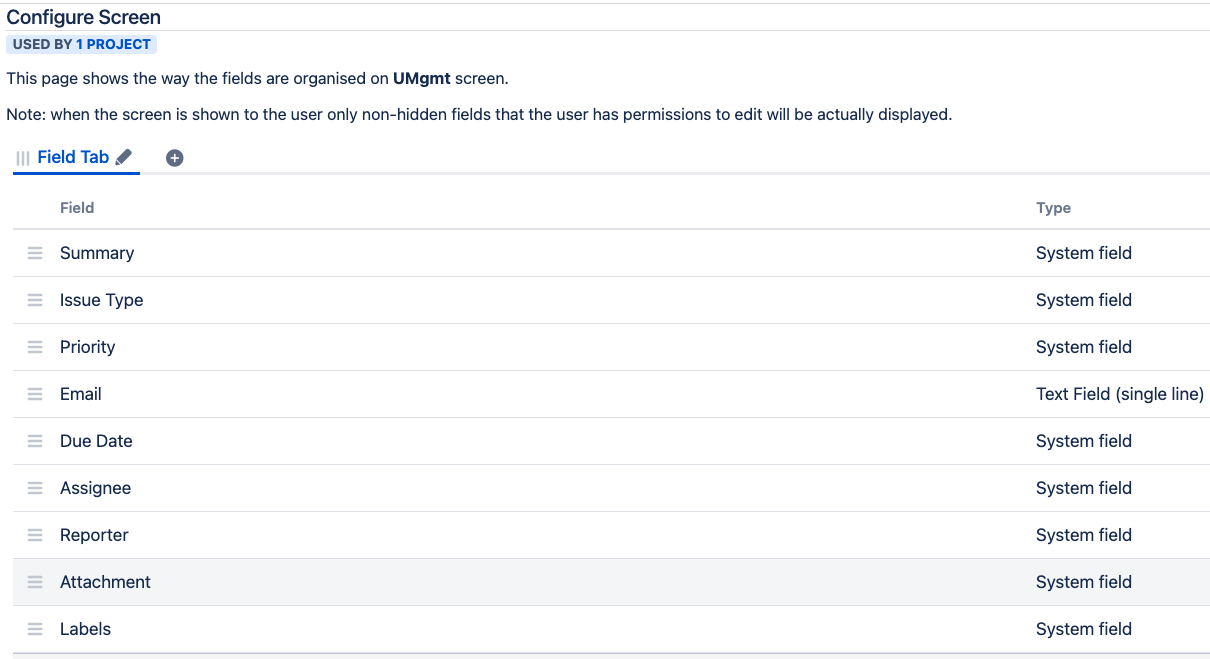
Hence, you need to think about which Jira (custom) fields you want to use in the new user issue to gather the required information. In this example, we use the Summary field to set the Full name of the new user and the custom field Email to set the Email address and Username.
Create User
Template
Set up a new Web Request Template to create the Jira user.
| Name | Create Jira User |
|---|---|
| Method | POST |
| Path | /rest/api/2/user |
| Headers | |
| Body | {
"name": "$!fieldHelper.getValueAsString("Email")",
"emailAddress": "$!fieldHelper.getValueAsString("Email")",
"displayName": "$!fieldHelper.getValueAsString("summary")",
"applicationKeys": [
]
}
|
| Content-Type | application/json |
Operation
Set up a new Single Issue Operation for Create User and add the following steps:
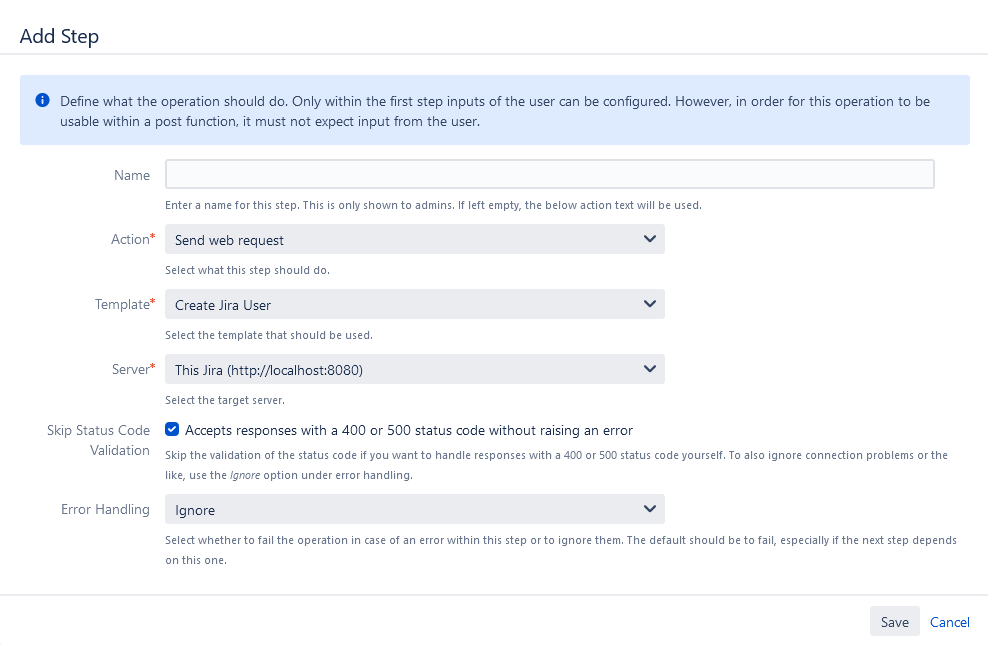
- Add the first step using the Send web request action with your new Create Jira User template. As Server choose the one where you want to create the new users and ensure you check Skip Status Code Validation and select Ignore for Error Handling for the next step to be called.
- Create the second step using the Create a comment action to add a comment to your user issue stating whether the request was successful or not.
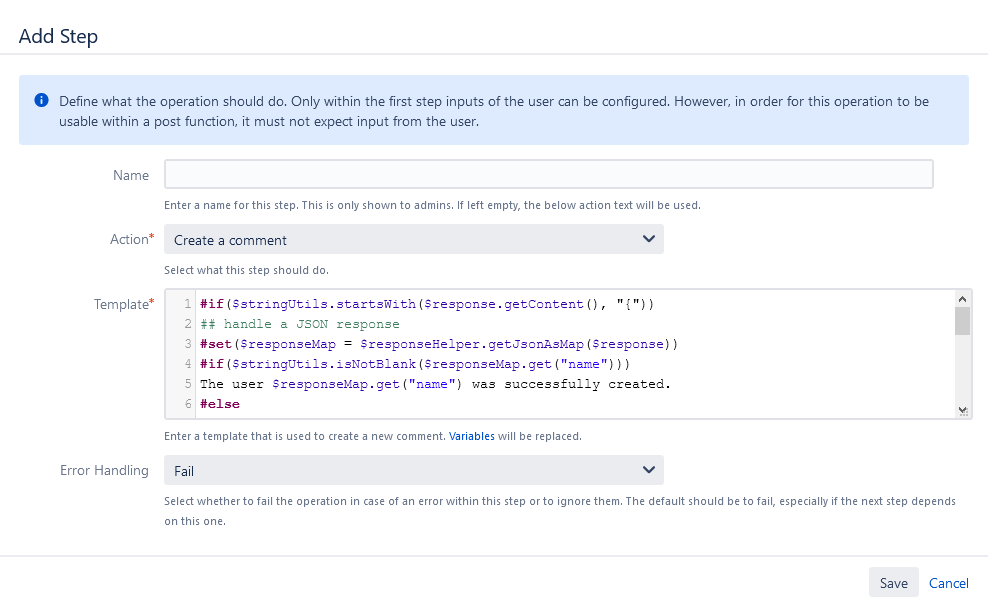
There are obviously various reasons why the creation of a new user could fail. The following template for a comment provides distinct statements for the successful creation of a new user as well as potential errors. As far as possible the error messages from the response are included as well.
#if($stringUtils.startsWith($response.getContent(), "{"))
## handle a JSON response
#set($responseMap = $responseHelper.getJsonAsMap($response))
#if($stringUtils.isNotBlank($responseMap.get("name")))
The user $responseMap.get("name") was successfully created.
#else
There was a problem while creating the user:
#if($collectionHelper.isNotEmpty($responseMap.get("errorMessages")))
Error Messages: $stringUtils.join($responseMap.get("errorMessages"), "; ")
#end
#if($responseMap.get("errors") && ! $responseMap.get("errors").isEmpty())
Errors: $stringUtils.join($responseMap.get("errors").values(), "; ")
#end
#end
#else
## handle a non-JSON response
There was a problem while creating the user. See log file for details.
#end
Deactivate User
Template
Set up a new Web Request Template to deactivate the Jira user.
| Name | Deactivate Jira User |
|---|---|
| Method | PUT |
| Path | /rest/api/2/user?username=$!fieldHelper.getValueAsString("Email") |
| Headers | |
| Body | { |
| Content-Type | application/json |
Operation
Set up a new Single Issue Operation for Deactivate User and add the following steps:
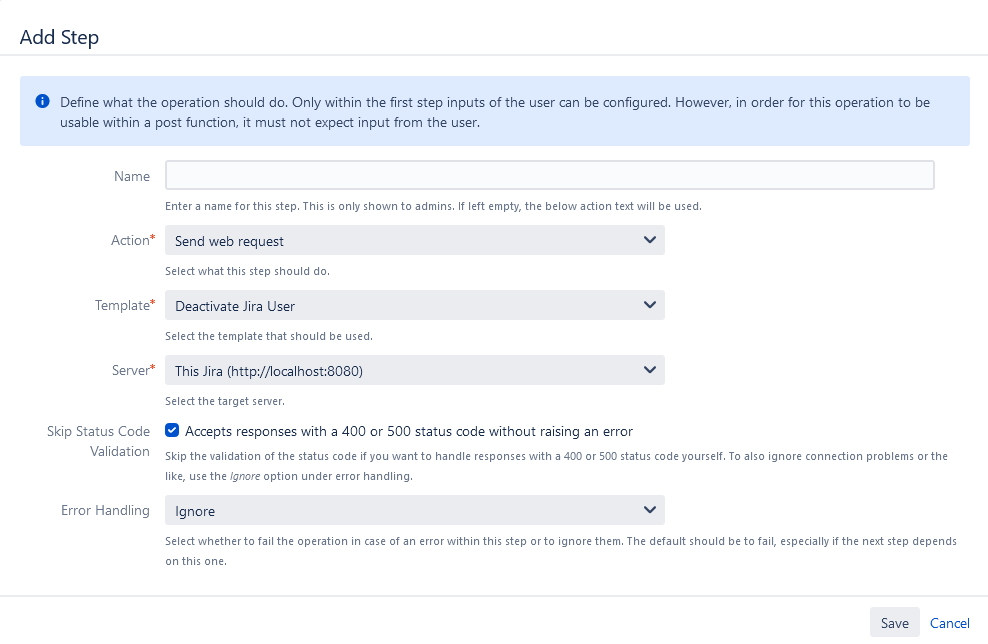
- Add the first step using the Send web request action with your new Deactivate Jira User template. As Server choose the one where you want to deactivate the users and ensure you check Skip Status Code Validation and select Ignore for Error Handling for the next step to be called.
Create the second step using the Create a comment action to add a comment to your user issue stating whether the request was successful or not.
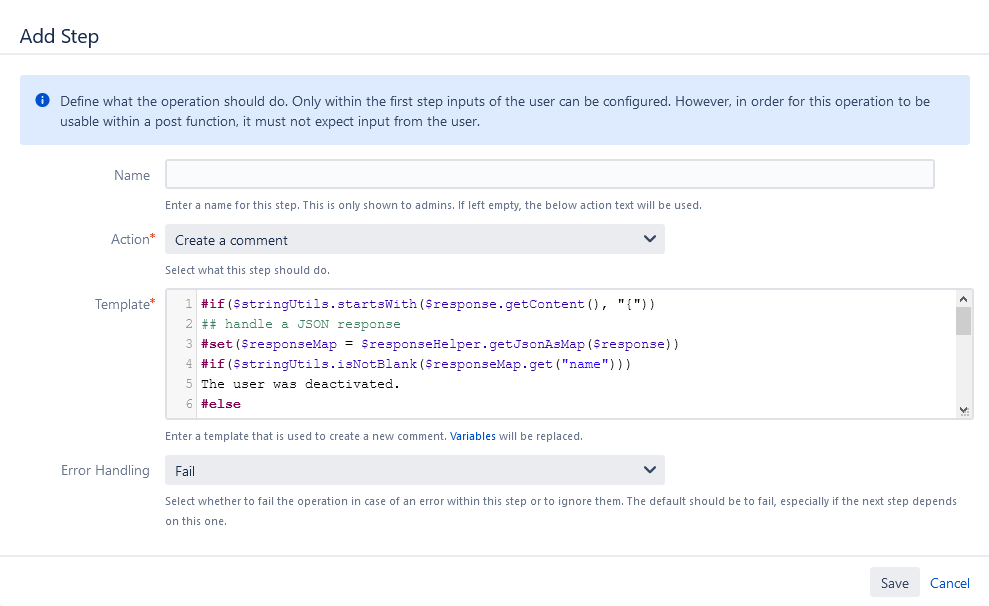
The following template for a comment provides distinct statements for the successful deactivation of a new user as well as for an error.
#if($stringUtils.startsWith($response.getContent(), "{"))
## handle a JSON response
#set($responseMap = $responseHelper.getJsonAsMap($response))
#if($stringUtils.isNotBlank($responseMap.get("name")))
The user was deactivated.
#else
There was a problem while deactivating the user:
#if($collectionHelper.isNotEmpty($responseMap.get("errorMessages")))
Error Messages: $stringUtils.join($responseMap.get("errorMessages"), "; ")
#end
#if($responseMap.get("errors") && ! $responseMap.get("errors").isEmpty())
Errors: $stringUtils.join($responseMap.get("errors").values(), "; ")
#end
#end
#else
## handle a non-JSON response
There was a problem while deactivating the user. See log file for details.
#end
Activate User
Template
Set up a new Web Request Template to activate the Jira user.
| Name | Activate Jira User |
|---|---|
| Method | PUT |
| Path | /rest/api/2/user?username=$!fieldHelper.getValueAsString("Email") |
| Headers | |
| Body | { |
| Content-Type | application/json |
Operation
Set up a new Single Issue Operation for Activate User and add the following steps:
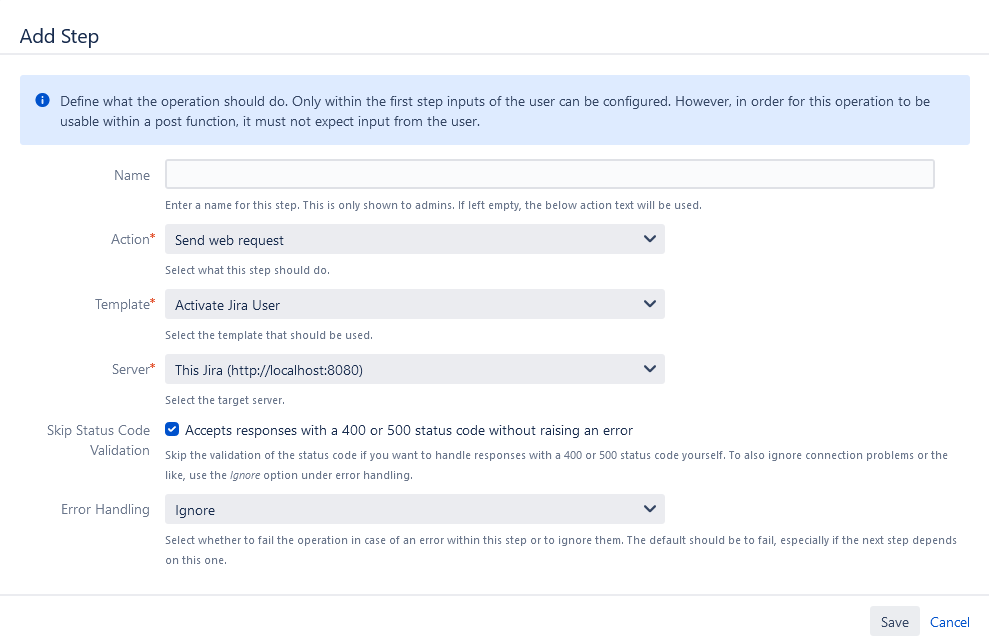
- Add the first step using the Send web request action with your new Activate Jira User template. As Server choose the one where you want to activate the inactive users and ensure you check Skip Status Code Validation and select Ignore for Error Handling for the next step to be called.
Create the second step using the Create a comment action to add a comment to your user issue stating whether the request was successful or not.
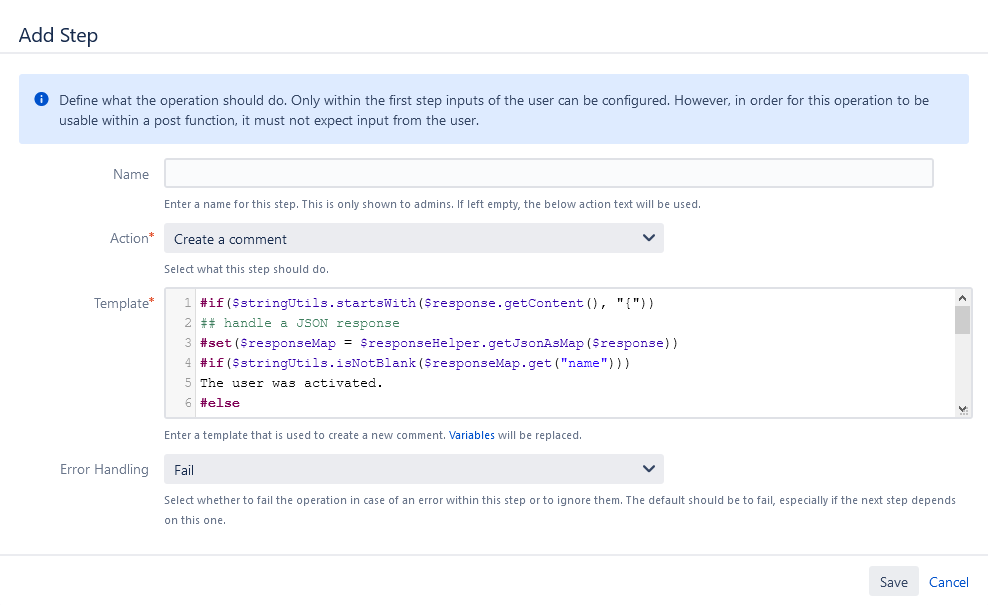
The following template for a comment provides distinct statements for the successful activation of a new user as well as for an error.
#if($stringUtils.startsWith($response.getContent(), "{"))
## handle a JSON response
#set($responseMap = $responseHelper.getJsonAsMap($response))
#if($stringUtils.isNotBlank($responseMap.get("name")))
The user was activated.
#else
There was a problem while activating the user:
#if($collectionHelper.isNotEmpty($responseMap.get("errorMessages")))
Error Messages: $stringUtils.join($responseMap.get("errorMessages"), "; ")
#end
#if($responseMap.get("errors") && ! $responseMap.get("errors").isEmpty())
Errors: $stringUtils.join($responseMap.get("errors").values(), "; ")
#end
#end
#else
## handle a non-JSON response
There was a problem while activating the user. See log file for details.
#end
Workflow
You can trigger the newly created operations manually by using the "Publish issue" action in the issue's "More" menu. Alternatively, you can set up a workflow to manage the users. The following workflow shows possible status and transitions for the process of setting up new Jira users:

- When a new user request issue is created in Jira, the initial status is New.
- To actually create the user, the transition Create User is triggered and the issue status changes from New to Active.
- To deactivate the user, the transition Deactivate User is triggered and the issue status changes from Active to Closed.
- To reactivate the user, the transition Reactivate User is triggered and the issue status changes from Closed to Active.
Add the corresponding operations to the transitions as post-function using the Publish Issue Function Using Operation.