Contact for Service
catworkx GmbH
Schellerdamm 16
21079 Hamburg
Germany
> Get Support![]() <
<
Content
| Info | ||
|---|---|---|
| ||
This page is not yet up to date for Version 3.0.0. |
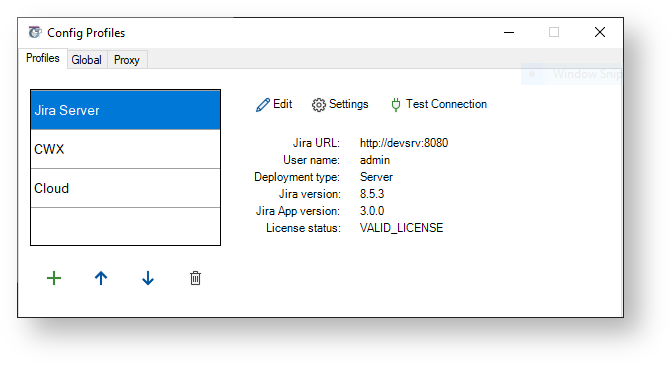
Before your Microsoft Outlook can access your Jira serverBefore you can setup the connection, you have to add a profile. See Manage Profiles for instructions.
After that you can configure the connection to your Jira server. There is a distinction between:
| Table of Contents |
|---|
There is a distinction between:
| Table of Contents |
|---|

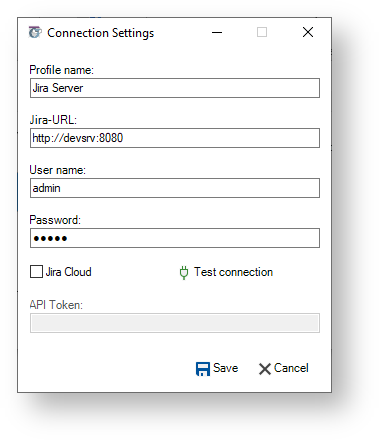
In the "Connection Settings" dialog, enter the following information:
Jira-URL: URL or IP address of your Jira server
| Info | ||
|---|---|---|
| ||
You have to specify the type of connection protocol with the URL (http or https). Otherwise the connection will fail. Futhermore, we recommend to use a fully qualified domain name (FQDN) instead of hostnames only. |
| Info |
|---|
If your Jira installation uses a special port you also need to specify the port number. Append the port number at the end of the URL separated by colon (e.g., |


Jira-URL: URL of your Jira Cloud instance, eg. https://<you-company>.atlassian.net
API Token: Please add an API Token here. Please create an API token here: https://id.atlassian.com/manage/api-tokens.
| Info | ||
|---|---|---|
| ||
The API token only needs to be created once and will be valid until it has been revoked. Further information on https://confluence.atlassian.com/x/Vo71Nw |