Import Configuration - v7.0.20.17
Before attempting to import any item the catWorkX Configuration Importer for JIRA checks whether all add-ons (referenced in the backup file) are available. Failing this check the administrator is requested to provide those add-ons first.
To import a configuration using catWorkX Configuration Importer for JIRA, do the following as system administrator:
- From the Administration menu, select Add-ons.
- From the sidebar on the left, select Configuration Importer for JIRA in the "catWorkX" section.
The "Configuration Importer for JIRA" dialog is displayed.
From the pull-down menu, select the type of configuration you want to import. For example:
Complete Project
Search Request
Portlet Configuration
By choosing what to import in the beginning the Configuration Importer for JIRA decides what other dependent configuration elements have to be imported, or at least checked, first before your requested import can take place. The names reflect the JIRA's internally used labels from the data-model.
To import dashboards, you have to select Portlet Configuration as configuration type.
Configuration Importer for JIRA only imports dependent elements. Therefor can be necessary to import some elements separately (e.g., status, resolution) if there are currently no dependencies but if they should be available in the future.
After having chosen a more complex item the Configuration Importer for JIRA will at least try to map all required elements and create all the missing ones before creating the final elements. For example choosing a workflow scheme, the Configuration Importer for JIRA will also check any workflows being referenced as well as users, custom fields, status and resolutions those are checked as well. The largest possible item that can be imported is a "Complete Project" as this will trigger all other importers as well.
Filter and Dashboards are not strictly configuration-"entities" but are often created by a project lead for the future project participants and it is more than helpful to be able to transfer any of them from staging- to production-systems anyway. catWorkX Configuration Importer for JIRA can even pick the single portlets from a dashboard for an import.
When importing workflows the layout created by the workflow designer is reapplied after the import.
Then click Start.
The "Upload File" dialog appears.
To select your exported configuration file, there are two options:
- Click Browse and navigate to it. You can import either the ZIP file or the file
entities.xmlthat is included in the ZIP file.
From the pull-down menu, select an ZIP or XML file with your exported configuration that is stored in the <JIRA-Directory>/import/ directory.
Then click Upload.
The "Select Configuration" dialog is displayed.
The dialog has five sections:
- Select Configuration: Select the configuration you want to import.
- Mapping Mode Setting: Determines if mapping is done manually and which configurations will be shown on mapping screens:
- Automatic: Entities with the same name are mapped. Entities that do not have an related entity with the same name on the target system are created.
- required only: Only required entities are provided to map manually.
- all available: All entities are provided to map manually.
- Options to choose from: Determines if special actions take place, like skipping configuration items. The options provided depend on the configuration type you want to import.
- Directory and Password to use: Determines the directory to create new users and groups in and the default password for new users.
- Dry Run Mode: Check this to only make a Dry Run. Nothing will be imported, only a Dry Run takes place for you to check for matches or conflicts.
After selecting the configuration you want to import, click Select.
The import starts.
(Optional) In manual mode entity by entity are provided and you can select an item to map it to.
Click Map to proceed with the next entity.
After a successful import, you will get an an report showing you what item was mapped to an existing one and what had to be created, including the new database.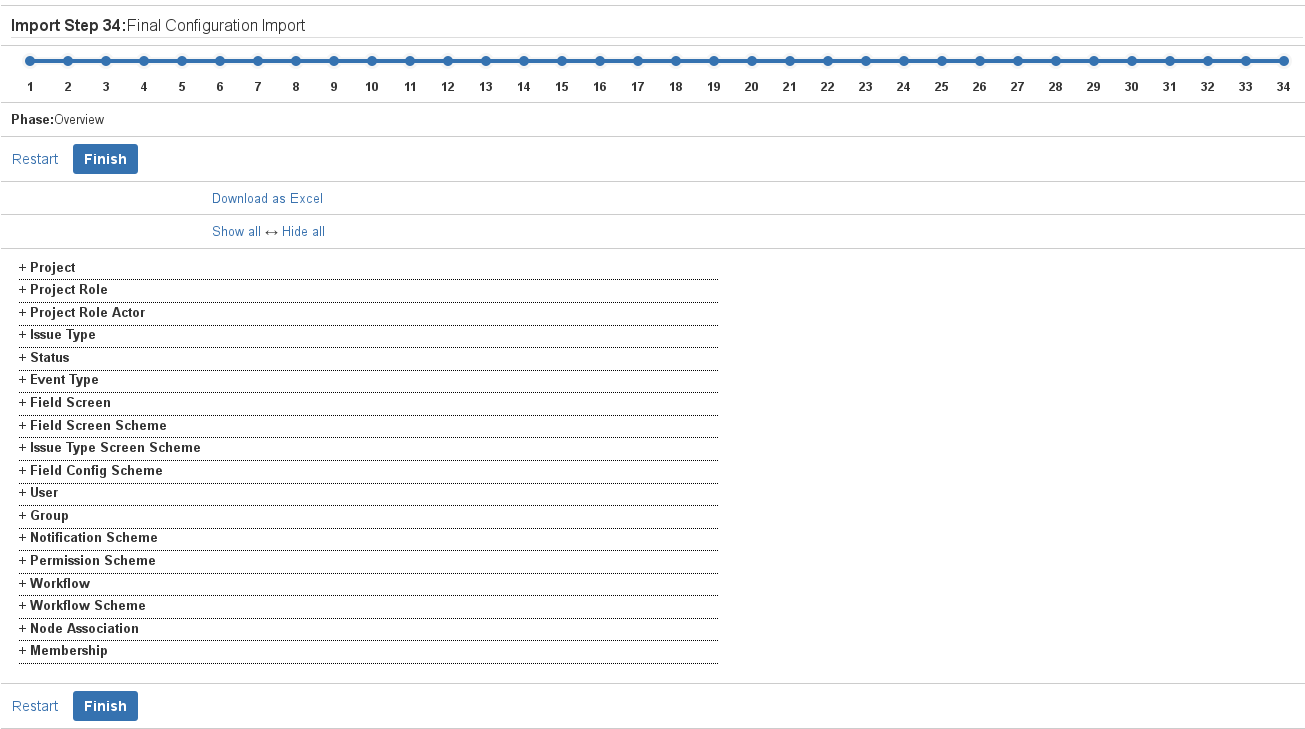
To see how an element is mapped, open the corresponding configuration type item in the list.
If you want to export the report to Excel, click Download as Excel.
When done, click Finish.