Create a Jira Issue
Once the installation and configuration of the add-on is completed, Jira issues can created directly from emails in Thunderbird.
To create an issue, do the following:
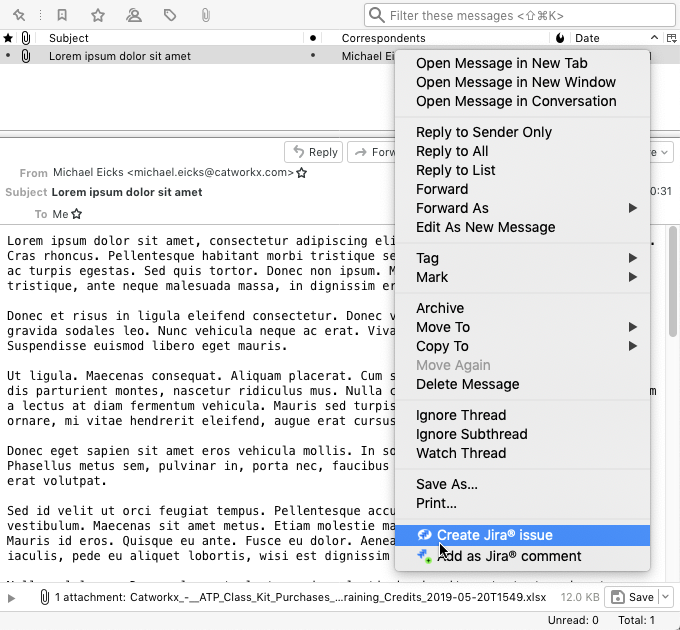
Right-click the email you want to create a Jira issue from.
By default the body of the email is used as issue description. If you select a part of the email's body text, only the selected text is used as issue description.
At the end of the context menu, you can find the Thunderbird Integration menu items.
If you select Create Jira issue the first time and the "New feature" dialog pops up, check the Do not show this dialog again option and repeat step 1 again.

Select Create Jira Issue from the email's context menu.
The "Create Jira issue" wizard is displayed.
- In the first dialog of the "Create Jira issue" wizard, you have to specify the project in which the issue should be created in and the issue type:
- To specify the project:
- Either select a project from the "Select a project" pull-down menu
Or enter a project name in the "search for a project" textbox. While typing, matching projects are displayed.Currently the "search for project" input element has been removed due to bugs in the code.
We apologize for any inconvenience.
- After specifying the project, the available issue types are displayed in the "Select an issue type" menu.
Select the correct issue type from the menu.

Click Next to continue.
The second dialog of the "Create Jira issue" wizard is displayed.
- To specify the project:
The second dialog of the "Create Jira issue" wizard displays all fields that are available on the create dialog for the selected issue type in the selected project in Jira.
Mandatory fields are marked by an asterisk ("*").
Enter the additional information and edit – if necessary – the displayed information. Inline attachments are currently not working due to a lacking interface in Thunderbird.
When done, click Next to create the issue.
The third dialog of the "Create Jira issue" wizard is displayed.
- In the third dialog of the "Create Jira issue" wizard, you can do the following:
- Click Open Issue to start your web browser or opens a tab in thunderbird itself and displays the created issue in Jira.
- Click Answer Mail to simply reply to the selected email.
Defaults for the email subject and body can be defined in the "Reply" tab of the "Thunderbird Integration for Jira preferences" dialog. - Click Open Issue and answer Mail combines both of the above features.
- Click Mail settings to display the "Reply" tab of the "Thunderbird Integration for Jira preferences" dialog, in case you have not yet done this previously. Thus you can setup your mail settings and choose to reply afterwards.
- Click Finish to finish the "Create Jira issue" wizard.